Top 10 Kitchen Design Mistakes

Featured

I’ve tried my best to learn from what I see people doing, but there always seem to be certain trends that even seasoned professionals can make. These are just a handful of what I witness regularly.

Photo by NeONBRAND on Unsplash

Trying to pack 10 lbs in a 5 lb bag

The most common and basic mistake I see people making is trying to pack too many items into a small space. They become hypnotized by photoshopped Instagram images and staged television spaces. They see the kitchen with the double oven, the pantry, the island with the wine refrigerator and seating, the wood hearth style hood with pullouts on either side, the 48” wide cooktop with drawers below and the 42” apron sink. Then they bring my a floor plan that is 10’x10’- a fraction of the 25’ x 35’ kitchen they’re showing me in photos. They think they’re clever when they give me specifications for the smallest possible model of the pro range. And they don’t understand when I start to explain that the choices they’ve made are why the kitchen feels and looks so cramped. Often this becomes an exercise of a client telling me what they want, me explaining why it won’t work and a solution to scaling the concept back, and the client insisting on wanting it their way. Then I’ll take the time to price the option out and show them a visual. It’s usually only when I show them the tight spaces required to accomplish the design or how little countertop space they’ll have before they realize maybe it’s too much for the space. Sometimes they don’t realize this until it’s far too late.

Photo by Aron Visuals on Unsplash

Remodeling things out of order/ trying to get things done out of order

Remember the order of operations from grade school? Well in remodeling there is often a loose set of operations that you should follow. I say loose because there are some items that are more loosey completed. But then there are those that really must come before another. Often clients don’t understand how critical this can be if something is missed or overlooked, or worse, pushed ahead without having made a decision. I have personally had the experience where you’re standing in a room full of demolition debris where they’ve not completed removing items and the electrician is in the corner trying to install the new island lights- BEFORE ANYTHING ELSE WAS INSTALLED. Finished lighting trim should have been one of the very LAST things to be done in this kitchen project and here this client was bringing in an electrician before demolition was complete. The chances that this lighting would get damaged before the project finished were astronomical. We did not end up taking the job.

Photo by Theme Photos on Unsplash

Overlooking necessary maintenance & focusing on cosmetics

This can be maddening. I’ve walked into too many old homes, with kitchens that haven’t been touched in 30 years, and the client wants to install a countertop. This situation occurs when the client wants to change out their laminate countertops for granite, but I can still see the paneled walls and shag carpets in the living room. Now, I get it- everyone has a budget and (most) people can’t be replacing their kitchen every year, but all too often these same clients mention how they plan to replace their cabinets in a few years, to which I always have to stop, turn to them and remind them of the previous mistake. They’re doing things backwards, and because they haven’t done much in the last 40 years of owning the home, now they’re way behind and the projects they do are going to be costly, instead of doing some basic projects every few years over the last 4 centuries.

Photo by Fabian Blank on Unsplash

Lack of a contingency budget

Unfortunately remodeling homes can be like feeling your way along in the dark, sometimes literally. At best, you’ve got a builder who has a VERY dim flashlight to help you navigate the process. But all too often we have NO IDEA what we’re getting into when we begin a remodeling project. We don’t know what we’ll find behind the walls, what kind of “handyman special” we’re going to find, or who was there before us. There’s always an unknown to this industry and honestly that can be daunting, even for us on the other side of things, trying to console a concerned client. But it’s also very important for clients to be entering into things with a realistic mindset. Shit happens. People fuck up. Things don’t get ordered on time. Delays occur. Acts of god happen. You need to be prepared for contingencies and most projects that come across my desk have a $0 contingency fund. This is a problem- don’t do it. I’ve heard all sorts of figures, depending on the size of project. Usually in residential construction I’ve heard 10% but it should be on a case by case basis.

Photo by sol on Unsplash

Not knowing how to choose sub-contractors

I’ve seen it so many times- the frightened and excited look in their eyes. They’re excited about their project, but reality is setting in. They’re starting to get bids back and realizing how much this is actually going to cost them and now that they’ve got some quotes for installation and they’re thinking about going with the guy that’s half the price of the other guy. Usually this other guy is half the price for a reason and it’s so important to investigate and understand WHY this other guy is half the price. You need to remember that your job as a project manager (remember you the homeowner taking on their own project is now the project manager) is to determine which sub contractors will fit well on your job. Tips for choosing subcontrators are to really interview them, have them come over and go over your project. Do they fit well with your personality or do they rub you the wrong way? Ask them questions about their history, past projects, and their workers? How do they work- do they have all subcontractors? Ask them for refernces and actually follow up on them, maybe going so far as to asking to see some of their work in person? Ask them for copies of their insurances and licenses. Ask them how they’ll run the job- will they be onsite themselves? Will they deal with neighbors who have issues with consturction noise, parking, deliveries, etc? And remember, anyone who pushes you to not further investigate them or their work does not deserve your business.

Custom Features may not appeal to future buyers

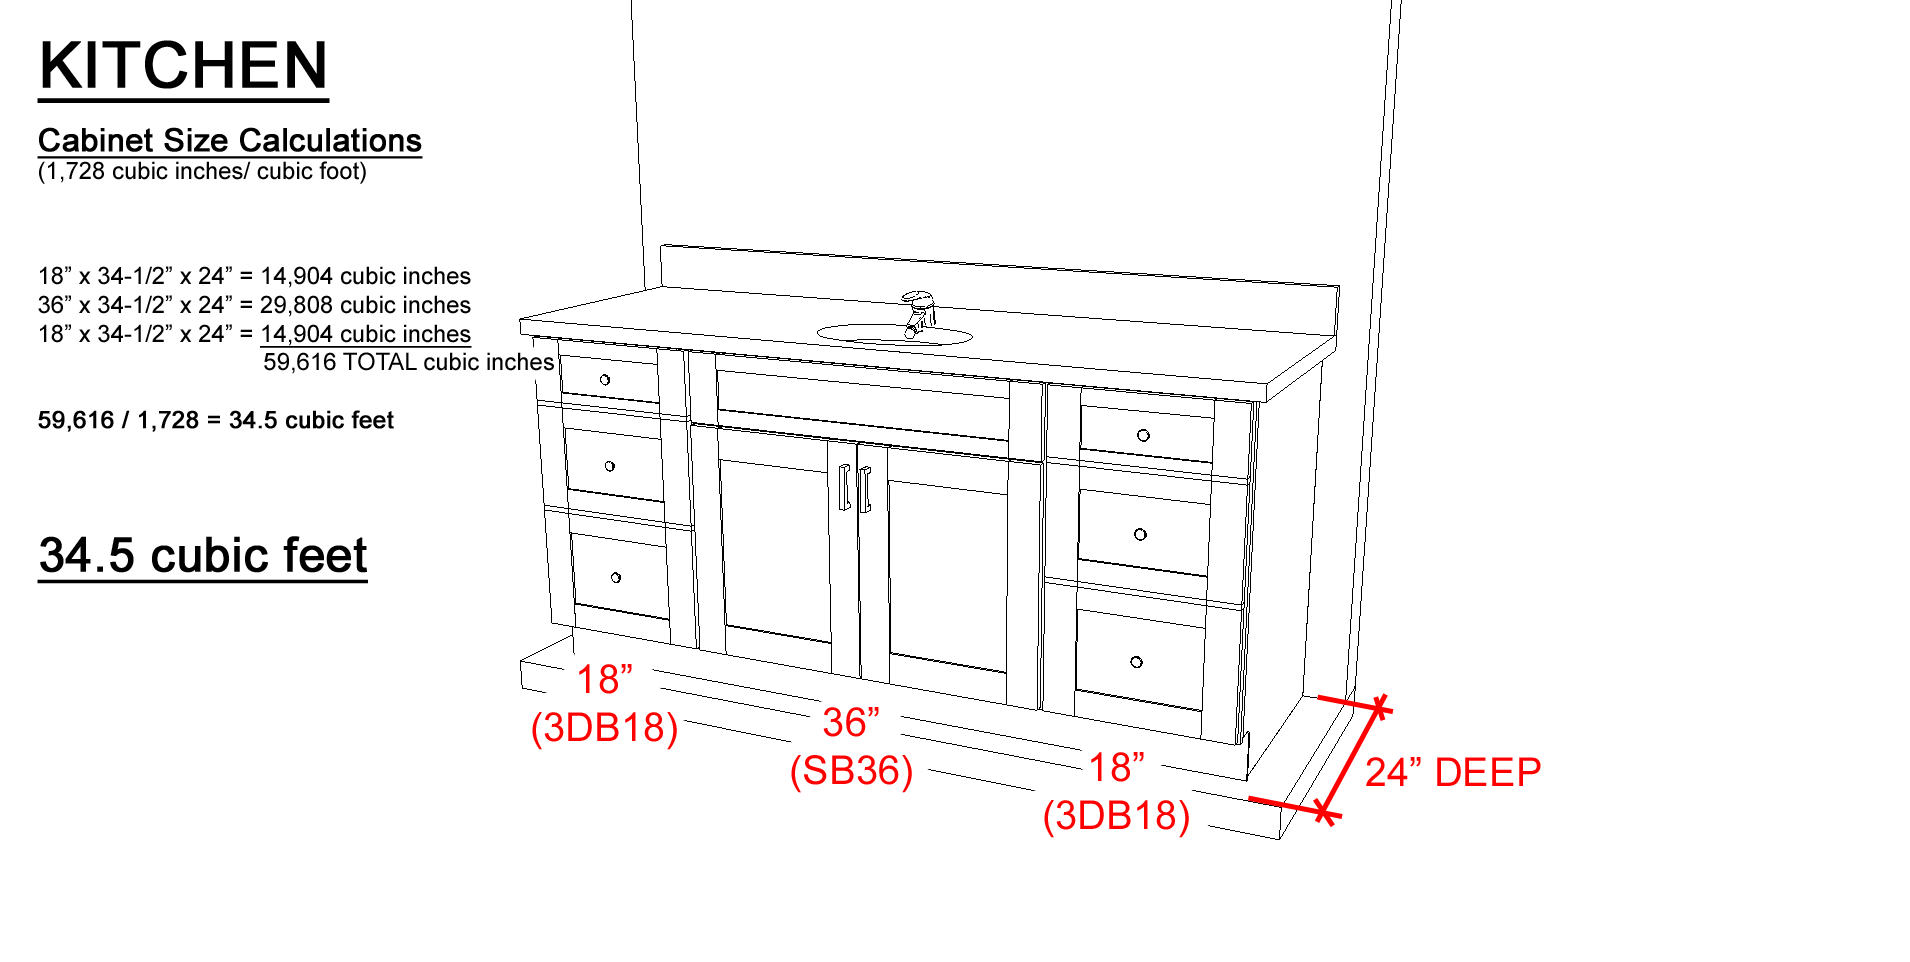
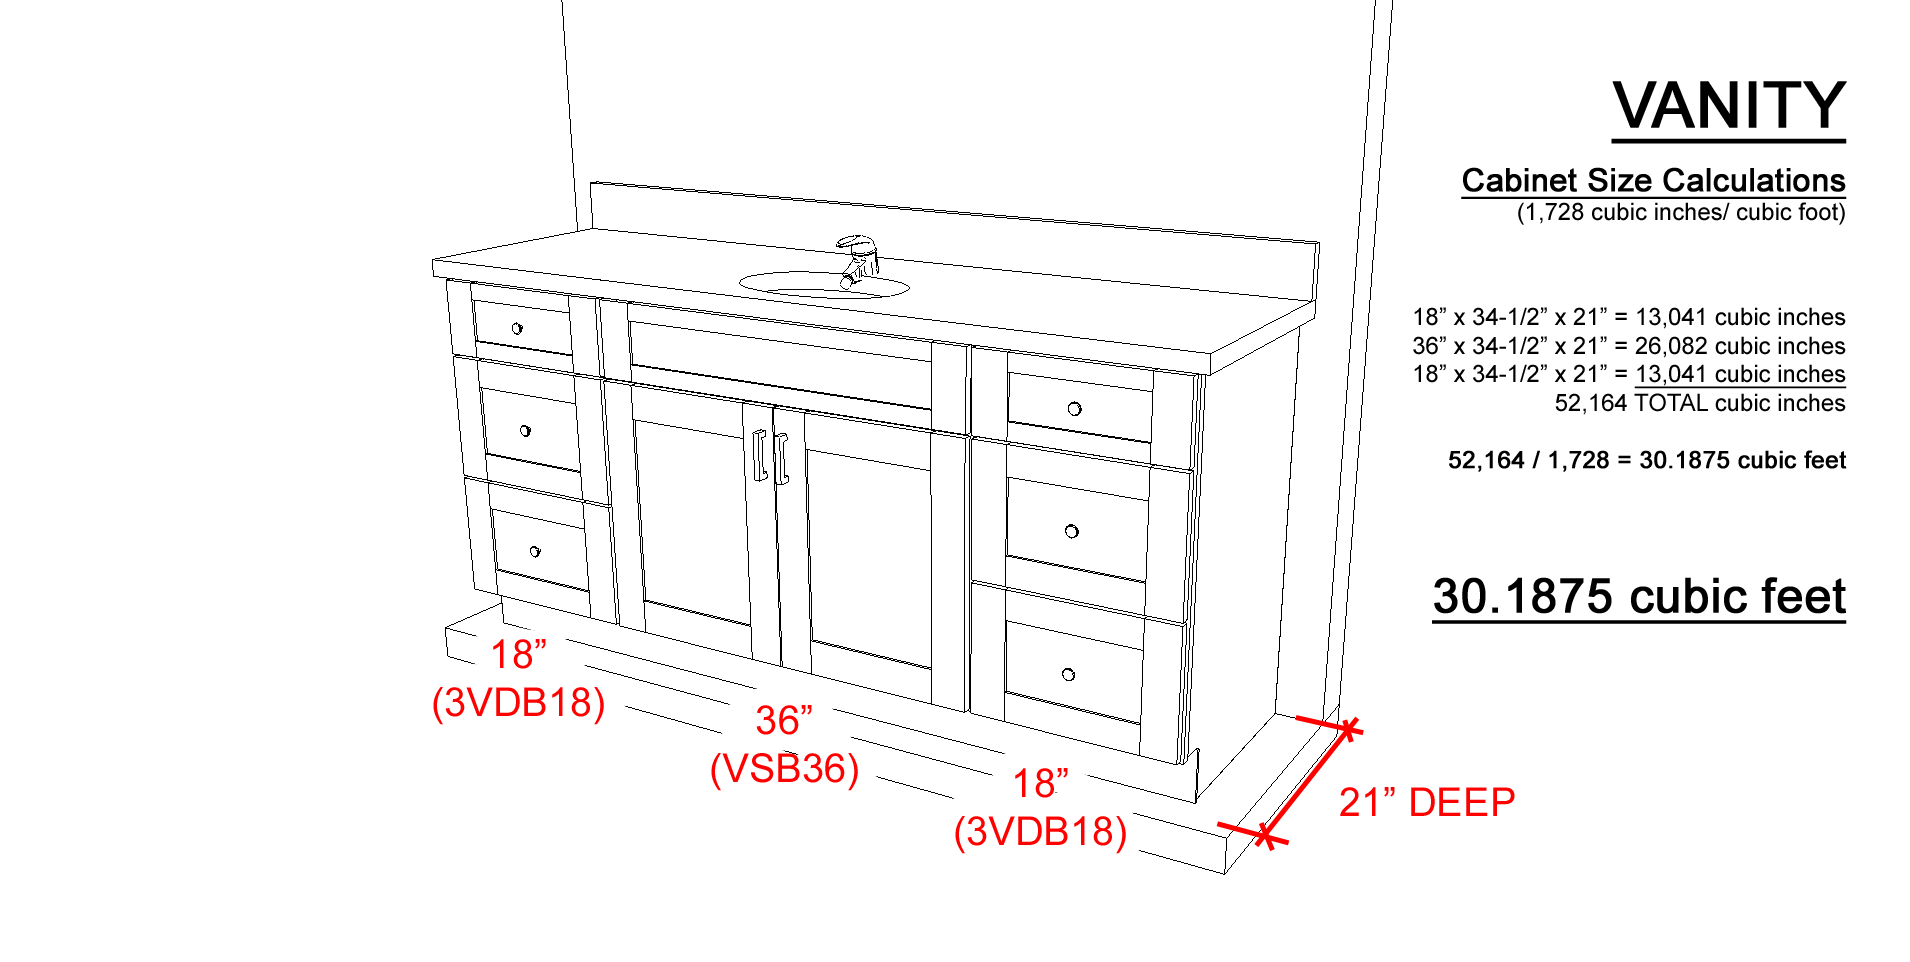
Usually I encourage people to not worry about future buyers, but occasionally I’ll get a client who has very specific tastes. In these cases I make sure to advise the client to try to appeal to a wide audience of buyers. For instance if someone came in and wanted a bright yellow, super modern kitchen (this has happened), I’d advise them that this is a giant risk and that they’d better be sure that they love this color and don’t mind taking a hit on the potential sale if a buyer feels they’ll need to redo the space. Other features I’ve seen are things like custom hidden gun locations, increased height base cabinets for taller people, extra deep cabinets, and other unique features/modifications that only appeal to a fraction of the market.

Photo by Annie Gray on Unsplash

Unlicensed contractors can cost more in the long run

Too many times I’ve seen clients get a sub par project because they went with the truck and ladder guy down the street instead of the guy who’s part of the home builders association and was a bit higher. Too often people make decisions based simply on numbers and the bottom line. They don’t look into credentials for builders, what associations they might be a part of, and how they might invest into their own business. Builders, remodelers, installers, designers, and anyone in this industry who go above and beyond will tend to rise to the top and begin to charge higher prices, this is a reality that should not be ignored. They’re charging higher prices for a reason- oftentimes because they are BETTER than the next guy. Part of the problem with these great guys though is just that- because they’re better they’ll help you avoid pain and cost in the long run. And because you cannot compare these situations, you’ll never have any idea truly how much pain a good builder will save you by being able to identify issues before they become issues and solve problems before you even know you’ve got a problem. These are the guys that I see get passed over for the installer who’s going to put your cabinets in backwards (I literally have seen this).

DIY also costs more in the long run (most of the time)

You don’t know how much it pains me to admit this. I grew up around a family that was constantly remodeling and building. My grandfather was a builder and my father enjoyed carpentry in the evenings. My childhood home was constantly being improved; an addition on the front, a kitchen renovation, remodeling the attic, adding doghouse dormers, new windows, etc all through my childhood. So I love the DIY culture. I love what social media and Youtube have done for the DIY culture. BUT my professional experience paints a different picture of the DIY culture. It’s very common for me to get clients who walk into the showroom and insist they can install cabinets.  They insist they can cut and install crown molding. They insist they can mount the decorative end panels. They insist they can field fabricate a toe kick platform (this is actually quite simple). They always insist they can do it while you’re both standing in the showroom. But for each of the examples above I’ve stood onsite with my DIY clients who’re scratching their heads when they realize how much harder it was to get an entire run of cabinets to be level than that Youtube carpenter made it look. It’s not a fun way to spend a day trying to clean a DIY’ers mess up.

Prioritize costs over quality/ lopsided budgets

I’ve mentioned this above- clients choosing costs over quality. I guess there’s a reason we have certain terms, like pennywise and pound foolish- I guess these people have been around forever. I’ve seen people come to me with lopsided budgets. Budgets where they’ve got the appliance pricing triple that of the cabinet AND granite pricing. Think about that- they want to take high end designer appliances (which are really only good for 8-10 years) and surround them by junk cabinets and countertops because your budgets are so skewed. I’ve had people order kitchens where the entire cost is less than a single appliance in the space. Many times people have brought me kitchen designs that require custom door panels or custom sized cabinets, but the cabinet line they’ve chosen is so low, due to their budget, that we can’t accommodate the request because they simply don’t make the items. Don’t do this- don’t have lopsided budgets.

Photo by Charles Deluvio on Unsplash

Major structural changes rarely pay off (monetarily)

I remember an early project in my career where I worked with a retired couple who just about rebuilt their entire first floor of their home which sprang from an addition of the rear. It didn’t start that way of course, it grew and grew and grew until the entire first floor was affected. It was a major project with so many learning experiences and I value the time so much. But looking back, and even during, we knew that these clients would never get their investment back in their home. Based on the neighborhood, the market at the time, and the total cost, I can’t see how they’ll ever get a return on the investment. Of course when I’m talking about return, I’m strictly speaking in terms of dollars. I am more than confident to say that the project returned for them as they knew this was a retirement home for them that they’d never leave. They weighed the options and determined that for them, the cost associated with living the way they wanted was well worth it.

Featured

DIY Cost Analysis- You’re probably fooling yourself

For me, the financial independence movement has a lot to do with efficiency. Efficiency of your dollars and efficiency of your time. All too often I’m seeing people make choices that aren’t the most efficient use of their time and resources and I have to wonder, have people forgotten about their most valuable asset? Their time here on earth? The opportunity costs that go along with their time?

Now if you want to DIY something to gain a new skill or be more proficient in something, that’s wonderful. But encouraging everyone to fix their own hot water heater or install their own tile backsplash just doesn’t make sense. And it seems like all the DIY posts I’m seeing all make the same mistake: you’re not paying yourself for the work you’ve done.

What I mean is, not literally taking money out of an account and paying yourself but when you’re looking at doing something, you need to figure in the cost of your hours in trying to understand what makes sense financially.

I put this kind of a mistake on par with the mental trap of “this item is 50% off so I’ll buy it”, even though you might not have purchased it previously had it not been on sale. I think we’re all guilty of this mistake, myself included.

Recently I saw a post for someone who’d taken on the project of installing their own backsplash, which I applaud. But looking at their post, I couldn’t help but think they were absolutely insane. This person took 50 hours to learn and install their own backsplash. 50 hours!

I don’t know about you and what your time is worth, but 50 hours is a lot of time. I also don’t know if you’ve ever had to portion your time out, in a freelance kind of way, but I have for design or drafting work and you’re looking at paying me a minimum of $50 an hour. This is because I’ve got to pay taxes on this income and my effective rate goes down as a result of this. Now also keep in mind that your time, your precious time that you’ve been given on this earth, is the most valuable “item” that you possess.

There are significant opportunity costs that come with time, even for those of you that have already reached financial independence- your time is still your most significant asset to this life you live.

So let’s say that this DIY guy was charging himself a modest $20 for his time (unheard of for skilled laborers in my area, even at side work prices), at 50 hours he’s looking at $1,000 for labor alone to install his backsplash, plus the cost of materials! In my area this would completely cover the labor AND materials for a modest ceramic backsplash (depending on what you choose, I’m talking basic white subway tile), for a professional installer.

THIS IS INSANITY.

You are much better off spending your time with your family, your friends, going for a walk, taking a bike ride, reading a book, than you are sweating over a backsplash.

I know, I know, I can hear you right now- but “he’s gaining a skill” and “he’s improving his abilities”. Maybe. But maybe he’s also wasting his time fumbling around with a trowel and a tile saw when he should really be devoting his life to something more enjoyable and more productive for the future.

Maybe this is particularly hitting close to home for me being the Fi Kitchen Guy and all- maybe I wouldn’t be on this rant if he was for instance learning to do his own brakes on his car- a skill that would be quite useful as this is a repetitive exercise he’d need to do over and over, but installing a backsplash? He’ll probably never need to do this again and if he does it’ll be few and far between, he’ll have lost the knowledge and skill he’d previously gained and have to fumble around all over again. Remember, a skill is only useful if you actually use it.

The Fine Print: Sometimes its better to just pay a professional

What I really want to convey with this post is just don’t fool yourself. If you’re attempting a project, make a list of materials AND labor that you think you’re going to expend. Then double that labor or at least multiply it by 1-1/2 times, because on a new project you’re going to be learning as you go. It’s going to take you much longer than it would a professional and you really need to account for that- all of it. All the hours scratching your head, all the extra trips to the big box store when you forgot that piece of edging or grabbed the wrong color grout- ALL of this needs to be accounted for.

This is the reality of the remodeling industry. I’ve spent 10 years in this world and I’ve often seen these kinds of mistakes erode profit and make a builder/remodeler think they’re making “X” on a job only to sit down after the dust has cleared (literally) and realize they made “Y” on the job.

Featured

10 Overlooked Signs of a Quality Cabinet

Many times clients will walk into a showroom and say to me “show me a good cabinet”, and I’m always disappointed in this line of thinking.

I will then try to explain to the clients that “good” is a relative term and what’s good for one client may not be good for another. You need to be able to choose what’s important in your design and emphasize those as priorities in selecting a cabinet.

That being said, in the world of cabinets, there are a number of basic items that have become somewhat standard: soft closing doors & drawers, plywood construction, and dovetailed drawer boxes are the MOST BASIC of features that people request and expect in my area.

But there are a number of items that you can also look for that indicate a certain level of quality in a cabinet manufacturer.

1.) Trash cabinets that divide the trash compartment from the drawer box

Companies that add an extra piece of plywood between the trash compartment of a pullout trash cabinet and the drawer box show a company that thinks about its customers and realizes that there’s a sanity issue here. Pullout trash cabinets that neglect to have this divider pose a potential sanity risk to anything stored in the drawer above the trash. Frequently I see people keeping cutlery in this drawer and if you don’t have a divider, you’re keeping your eating utensils very close to a source of contaminating bacteria.

2.) Metal Shelf Clips VS Plastic Shelf Clips

Metallic shelf clips will last longer than plastic ones. Plastic has a tendency to become brittle with time. Quickly taking a look at these while you’re shopping for cabinets and familiarizing yourself with the options available may help to sway you from one cabinet line to the next. Below you’ll see an example of metallic shelf clips as well as a lower quality plastic clip. Make sure to speak with your designer though- some cabinets lines ship you a shelf with a plastic “shipping clip” to hold the shelf in place during delivery, that needs to be changed out once they’re installed. Make sure to check that your installer does this as I’ve seen more than once where the installer doesn’t realize and leaves it as is.

3.) Name brand hinges & drawer glides

Not all hinges and glides are created equally. Just because your designer tells you they’re “soft close” doesn’t mean much at all except just that, they’ll close softly. But how long will they last? Who will provide a replacement if there’s a defect? Choosing a cabinet line that uses a name brand hinge and glide is the best possible option for longevity in the kitchen & bath. Remember, these are the moving parts of a cabinet, the pieces that will get a fair amount of use over the lifetime of the cabinet, and you don’t want to use something that doesn’t have a quality company behind it.

4.) Finger jointed mitered door corners

This only applies to a mitered door- that is a door that has a corner with a 45 degree angle, similar to a picture frame. Mitered doors are notorious for having issues with the miter opening, usually due to changes in temperature and humidity. A quality company is going to try and prevent this miter from opening, using a finger joint that allows the miter to be stronger. This will be hard to see on a painted cabinet, but will be evident on a stained cabinet. If you’re unsure, make sure to ask your designer, and always get it in writing.

5.) Wood veneer sides VS laminate sides

This is often overlooked and can sometimes be deceiving unless verifying with a specification sheet. The exterior sides of a cabinet are typically of two different materials- a wood veneer on plywood or furniture board that is then stained or painted to match the rest of the cabinet; or a laminate veneer on plywood or furniture board that is a match to the stain or paint on the cabinet. Notice the word, “match”. When a cabinet is exposed to sunlight over a number of years, it will begin to age. If you don’t use the same material on the doors of the cabinet that you use on the side of a cabinet, you could see some irregular wear over time. I usually recommend using a cabinet that utilizes uniform materials on all sides.

6.) Flush interior bottoms

This applies only to a framed cabinet. Framed cabinets consist of a frame that sits on the cabinet box. Doors and drawers can sit on top of or within this frame. Due to this frame, the sides, top, and bottom of the cabinet are dadoed, or inserted into a groove in this frame to securely hold it in place. Because of this dado, this usually creates a lip on the inside edges and top and bottom of the cabinet. Certain companies will offset this dado to create a flush bottom, so that when removing a glass or dish you don’t nick the lip creating damage or unsightly dents.

7.) Concealed door pin holes

Cabinet doors are held together through a number of ways. The best connection is going to be through the use of a glue and rigid fasteners like a finish nail. Quality companies are going to fabricate a door and use a finish nail to hold the door together, but they’ll also fill the nail hole and paint over it so that you don’t see it when opening the door. A company that doesn’t do this is essentially skipping a step that will result in a lower quality product.

8.) Quick Release Hinges

A newer item that has become more popular is a quick release hinge. These hinges are composed of two separate parts that snap together and remove easily. Cabinet companies that use these are going to be paying a little more for the item and as such will cost a little more. This makes the installers life easier as they don’t have to unscrew the door to remove it while hanging the cabinets- they simply pop off and snap on again. This also makes it easier for the homeowner should they need to remove a cabinet door- they don’t need to unscrew anything, just pop off and pop on again.

9.) Packaging- less is more

This sounds somewhat contrary, but in my experience, the less packaging a cabinet has, typically the higher end it is. Now I’m not talking about a cabinet in a box with shoddy packaging- I’m saying if your cabinets come in a truck, “blanket wrapped”, with shipping blankets- that is typically of a higher quality than a cabinet that comes completely packed in styrofoam. This is because the company that shipped it knows it’s going to get beat up and NEEDS to completely package it in styrofoam or they’re going to be replacing cabinets left and right.

10.) Hinge screw covers

It’s the little things, right? Some cabinet companies are going to produce extra little covers that will conceal where the hinge is screwed into the cabinet box. These little extra details are clear signs that a company really cares about the end result of the cabinet installation and wants to make sure you get a certain aesthetic.

Featured

How to save money on my backsplash?

Recently I was working with a builder on a spec house and he asked me about the cost for the backsplash that I’d included with my granite quote.

This isn’t a strange occurrence, many times builders are trying to save every dollar they can, but it did get me thinking- what IS the most cost effective option for backsplash?

This answer largely depends on what the situation is, who’ve you’ve already got contracted on the job site, and your personal aesthetic.

In this particular situation, this was a new construction spec house, meaning this was a brand new house that wasn’t being built for a particular person but on speculation that the market is good enough and the builder will be able to sell it. So the builder here is going to be using basic materials- if they are using a tile they would specify a modest, white ceramic subway tile.

So, let’s look at the options for a backsplash:

  • Matching Countertop Material: The first option below is what I usually propose to clients as the easiest, but also the most common. This would entail taking a piece of matching countertop material, whether stone or solid surface or laminate material and running it up the back wall, usually at a height of 4″. Occasionally you may also see this run all the way up the wall for the full height of the backsplash
  • Ceramic/Stone/ Glass Tile Backsplash: This is becoming a more popular option than the matching countertop material. This would entail a countertop being installed, then tile applied on the rear wall down to the countertop. There are a variety of options with this as well- most commonly I see this applied at the full height of the backsplash, from the countertop to the underside of the wall cabinets. A less common variation on this is to simply apply just a few rows of tile up from the countertop, something I rarely see in my area. There’s more flexibility in selecting a variety of materials including ceramic, stone, glass, or even metallic pieces. Keep in mind that some of these materials get quite expensive, especially glass tile, so the costs detailed below could be skewed
  • Full Sheet Glass/Textured Solid Surface/ Other Exotic Materials: Similar to the first option, I’ve occasionally seen backsplash surfaces that might be a solid surface material that’s carved or routed to mimic tile, or a full height glass panel backsplash. There are an endless number of design options for dressing a backsplash. For our purpose in this post we won’t be focusing on these materials as they’ll typically be in an upper level price point and will not be cost effective

Let’s take a look at the numbers

In the above mentioned scenario, we’ve got an L-shaped kitchen that has approximately 33 square feet for a full height backsplash and 5.7 square feet for a standard backsplash. If we look at the increased square footage of countertop, our costs are going to be lower at $310.85, but if we want to use a basic, white ceramic subway tile, our costs are going to increase, depending on where we purchase materials, anywhere from $663.42 – $702.26.

Where’d these number’s come from?

**Labor is bumped up a bit for the big box store because these materials are typically of a lower quality than a tile supply house and will require more care in installation**

The Fine Print

Think carefully about the priorities in your project and what your goals are- for this builder, it’s my recommendation to do a matching countertop backsplash, but if this were your dream home, you should spend the extra to get what you want. There’s no clear cut answer and it’s going to vary from project to project. The point here is to simply think through your design choices and price out all your options.

Featured

Vanity Pricing Analysis: Why are vanity cabinets more expensive than kitchen cabinets?

Vanity cabinets are more expensive than kitchen cabinets.

You’re getting less product, for more money.

In order to analyze this we have to first understand the main differences between the wooden boxes we’ll refer to later in the article as “Vanity” cabinets and “Kitchen” cabinets.

Historically vanity cabinets have been at a shallower depth (21″) and at a shorter height (anywhere from 30-1/2″ – 32-1/2″ ) than kitchen cabinets which have typically been made a little larger, at 34-1/2″ tall and 24″ deep.

We are seeing a trend in the industry toward taller vanities, but still at the shallower depth.

**Keep in mind these dimensions don’t include overhangs and countertop thicknesses. For instance, our countertop height has historically been estimated at 1-1/2″ thick, which would bring our kitchen countertop height to 36″ and our vanity to 32″ +/-. Our depth on a kitchen counter will be 25″ +/- and vanity will be 22″ +/-. **

Vanities have 12-1/2% less space, but cost an average of 15% more!!!

So why the higher cost?

Honestly, I had no idea- so I asked the reps.

I surveyed 4 of the companies that I’ve analyzed to try and find out what the representatives thought about the price discrepancies. I got some similar answers from different reps with some saying that vanities are sold as part of a smaller package than kitchens and therefore need to make up a margin difference. Other reps ended up agreeing with me that there appeared to be no sound reason for the increase.

What about the numbers?

The Fine Print

So, why doesn’t everyone just use kitchen cabinets in place of vanity cabinets?

Sometimes it just isn’t possible to achieve the design the client wants.

Sometimes you really don’t have those 3″ extra inches in depth.

Sometimes it’s going to mess up your special vanity countertop program discount and those 3″ extra inches are actually going to bump you up into the next price group negating any price savings.

There could be any number of items that skew my above analysis and make this not work in your case or not work in the particular design you’re attempting.

I can only speak for myself as far as the prices go. They can vary greatly by region, product availability, and as we’ve seen recently, geo-political developments.

The actionable takeaway from this analysis should be to analyze your prices in depth and make sure to explore options that might not seem conventional.

The “Treat Yourself” Trick

You know this one, the one where you trick yourself into buying something or spending more money than you’ve actually got because “you deserve it”. I’ve done it and I’d be willing to bet you have as well? I especially see this in the kitchen and bath design process. Sometimes it makes sense, but many times it doesn’t. And the root of it all is an impulsiveness tied to the emotion of envisioning an ideal reality.

I caution this to clients when making purchasing decisions on certain items in their kitchens and bathrooms. Think carefully about where you’re placing your money and on what items. Does your appliance budget deserve to be 4X your cabinet budget? Is it a good idea to surround a high end appliance with a low end cabinet? I stress balance in a project to try and avoid these situations where you have inappropriately matched materials, and sometimes labor.

Now this isn’t always a bad thing- you certainly DO deserve nice things and to enjoy yourself in this life, but I’d recommend for caution when weighing whether or not you deserve something and whether it’s appropriate for a project. I have found that when I notice I am talking myself into something, that I’m doing just that- talking to myself to try and convince what I know to be false, to be true.

The most important part being the realization of the self, trying to talk itself into something. If you can begin to master this interruption of impulse, I think it will lead to increased future happiness.

Simply being aware of what’s happening in the moment itself, is most times enough to interrupt the moment so you can step back and see it for what it really is.

And if it still seems like it’s a good idea to buy that thing, then go for it, but the interruption is key.

Photo by Ishan @seefromthesky on Unsplash